If you see this post it means that BlogEngine.NET is running and the hard part of creating your own blog is done. There is only a few things left to do.
Write Permissions
To be able to log in, write posts and customize blog, you need to enable write permissions on the App_Data and Custom folders. If your blog is hosted at a hosting provider, you can either log into your account’s admin page or call the support.
If you wish to use a database to store your blog data, we still encourage you to enable this write access for an images you may wish to store for your blog posts. If you are interested in using Microsoft SQL Server, MySQL, SQL CE, or other databases, please see the BlogEngine docs to get started.
Security
When you've got write permissions set, you need to change the username and password. Find the sign-in link located either at the bottom or top of the page depending on your current theme and click it. Now enter "admin" in both the username and password fields and click the button. You will now see an admin menu appear. It has a link to the "Users" admin page. From there you can change password, create new users and set roles and permissions. Passwords are hashed by default so you better configure email in settings for password recovery to work or learn how to do it manually.
Configuration and Profile
Now that you have your blog secured, take a look through the settings and give your new blog a title. BlogEngine.NET is set up to take full advantage of many semantic formats and technologies such as FOAF, SIOC and APML. It means that the content stored in your BlogEngine.NET installation will be fully portable and auto-discoverable. Be sure to fill in your author profile to take better advantage of this.
Themes, Widgets & Extensions
One last thing to consider is customizing the look and behavior of your blog. We have themes, widgets and extensions available right out of the box. You can install more right from admin panel under Custom/Gallery.
On the web
You can find news about BlogEngine.NET on the official website. For tutorials, documentation, tips and tricks visit our docs site. The ongoing development of BlogEngine.NET can be followed at CodePlex where the daily builds will be published for anyone to download.
Good luck and happy writing.
The BlogEngine.NET team
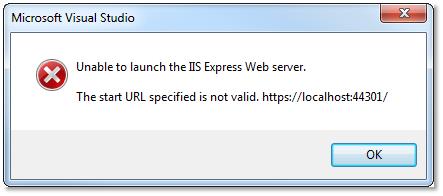
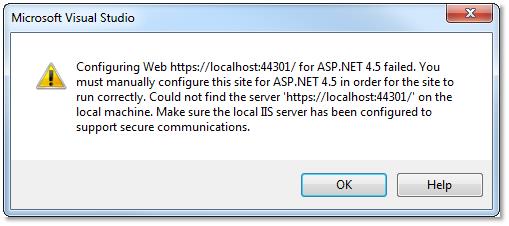
If you are getting any errors that look like these then you will need to make some changes to your IIS config file.
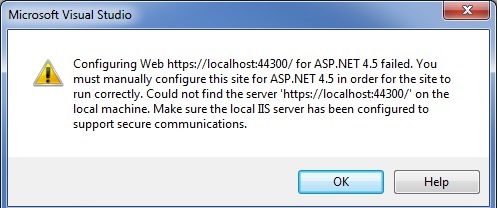
The first step is to open the file. It is located at the path: C:\Users\<your username>\Documents\IISExpress\config. Open the file named "applicationhost.config"
Once you have the file open scroll down to where the tag <sites> is located.
Under that tag there are each individual site. Locate the site for DCPortal.
Inside the DCPortal site, there is a <bindings> tag. Copy the line that starts with <binding and paste it on the line below.
On the pasted line change the protocol inside the binding tag to say "https"
Then change the bindingInformation to say "bindingInformation="*:44300:localhost".
You will have to follow the same procedure for DCUniversal, except the bindingInformation for that is "*:44301:localhost"
Hope this helps.